Speed Trim Unfold  

Maya Versions
Tested in Maya 2022-2027
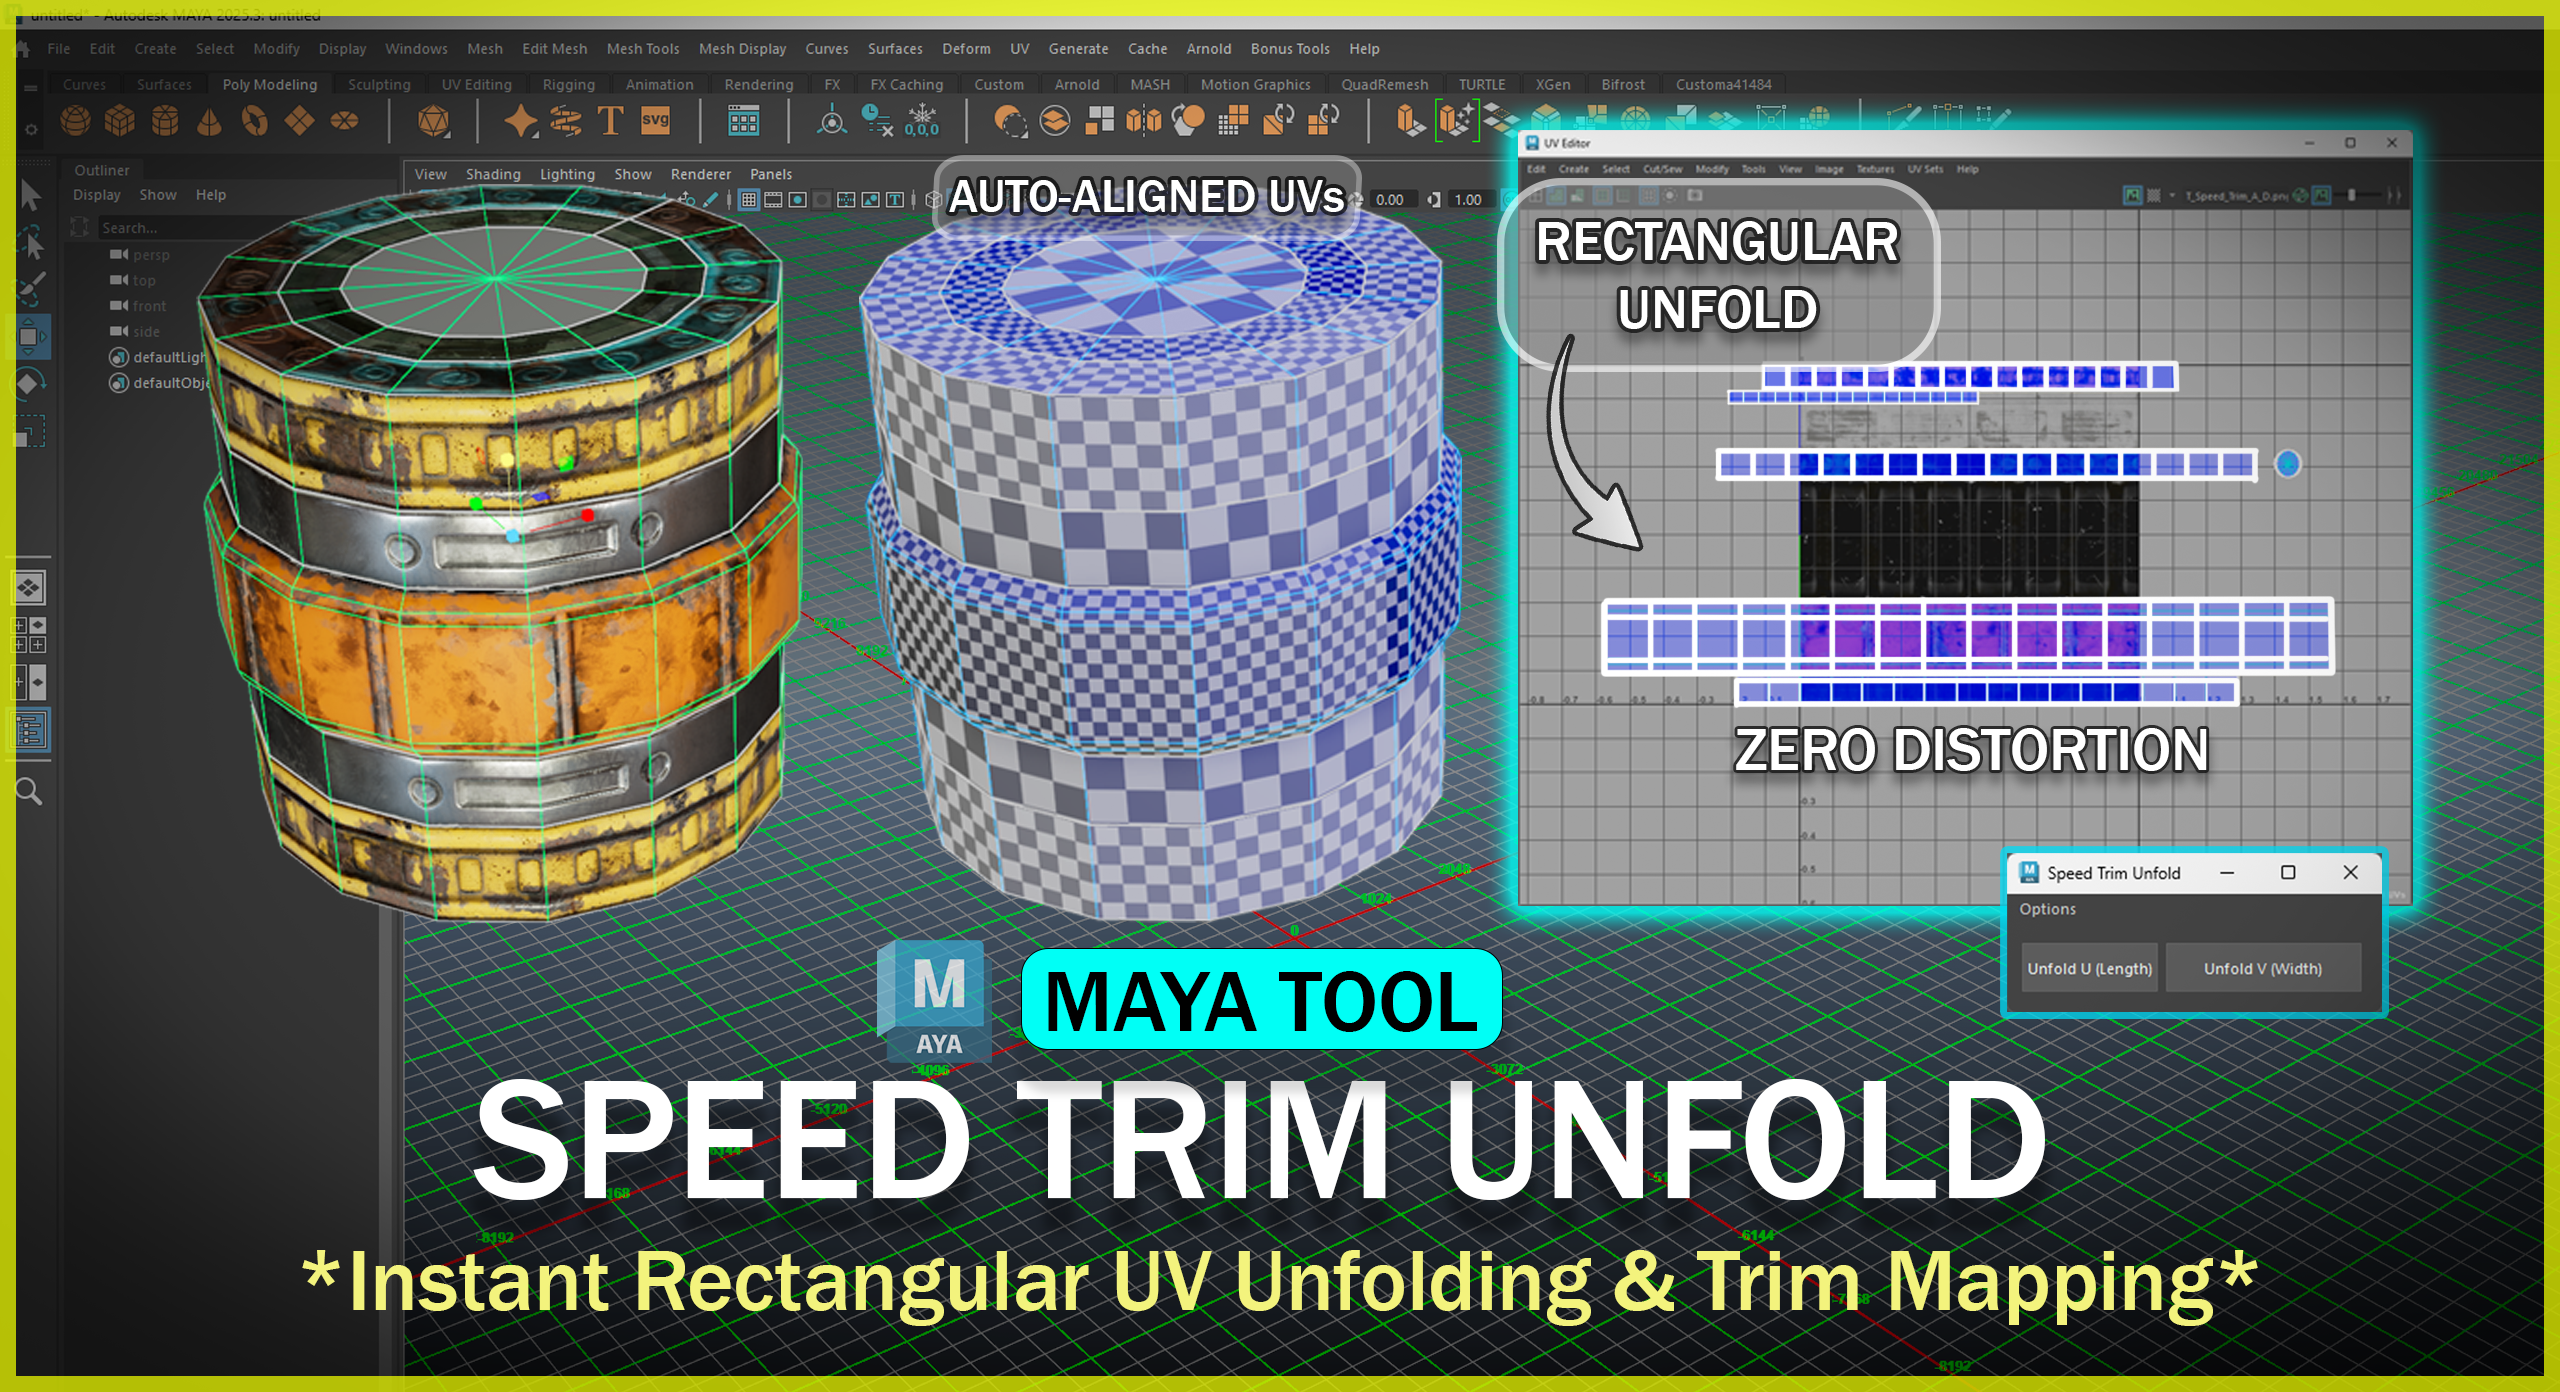
Speed Trim Unfold is a tool that will quickly unfold your trim sheets and also map those to any existing laid out trim sheet.
It's a one-click solution to save you time and make UVing a more fun and engaging process.
How it works
Important
The examples presented are all using the Unfold/Align U as a hotkey, with the Auto-Orient checkbox (from the UI) checked.
For the UI version check UI Button Functionality.
Depending on the type of component you have chosen the tool has different behaviours.
Please check the Rules section
-
The tool works by selecting:
-
1. Faces selection (automatic approach)
Unfolding face selections - If you have selected only faces and those faces loop around in a closed circuit (like the faces of a cylinder) then the tool will create an automatic seam to cut through those faces.
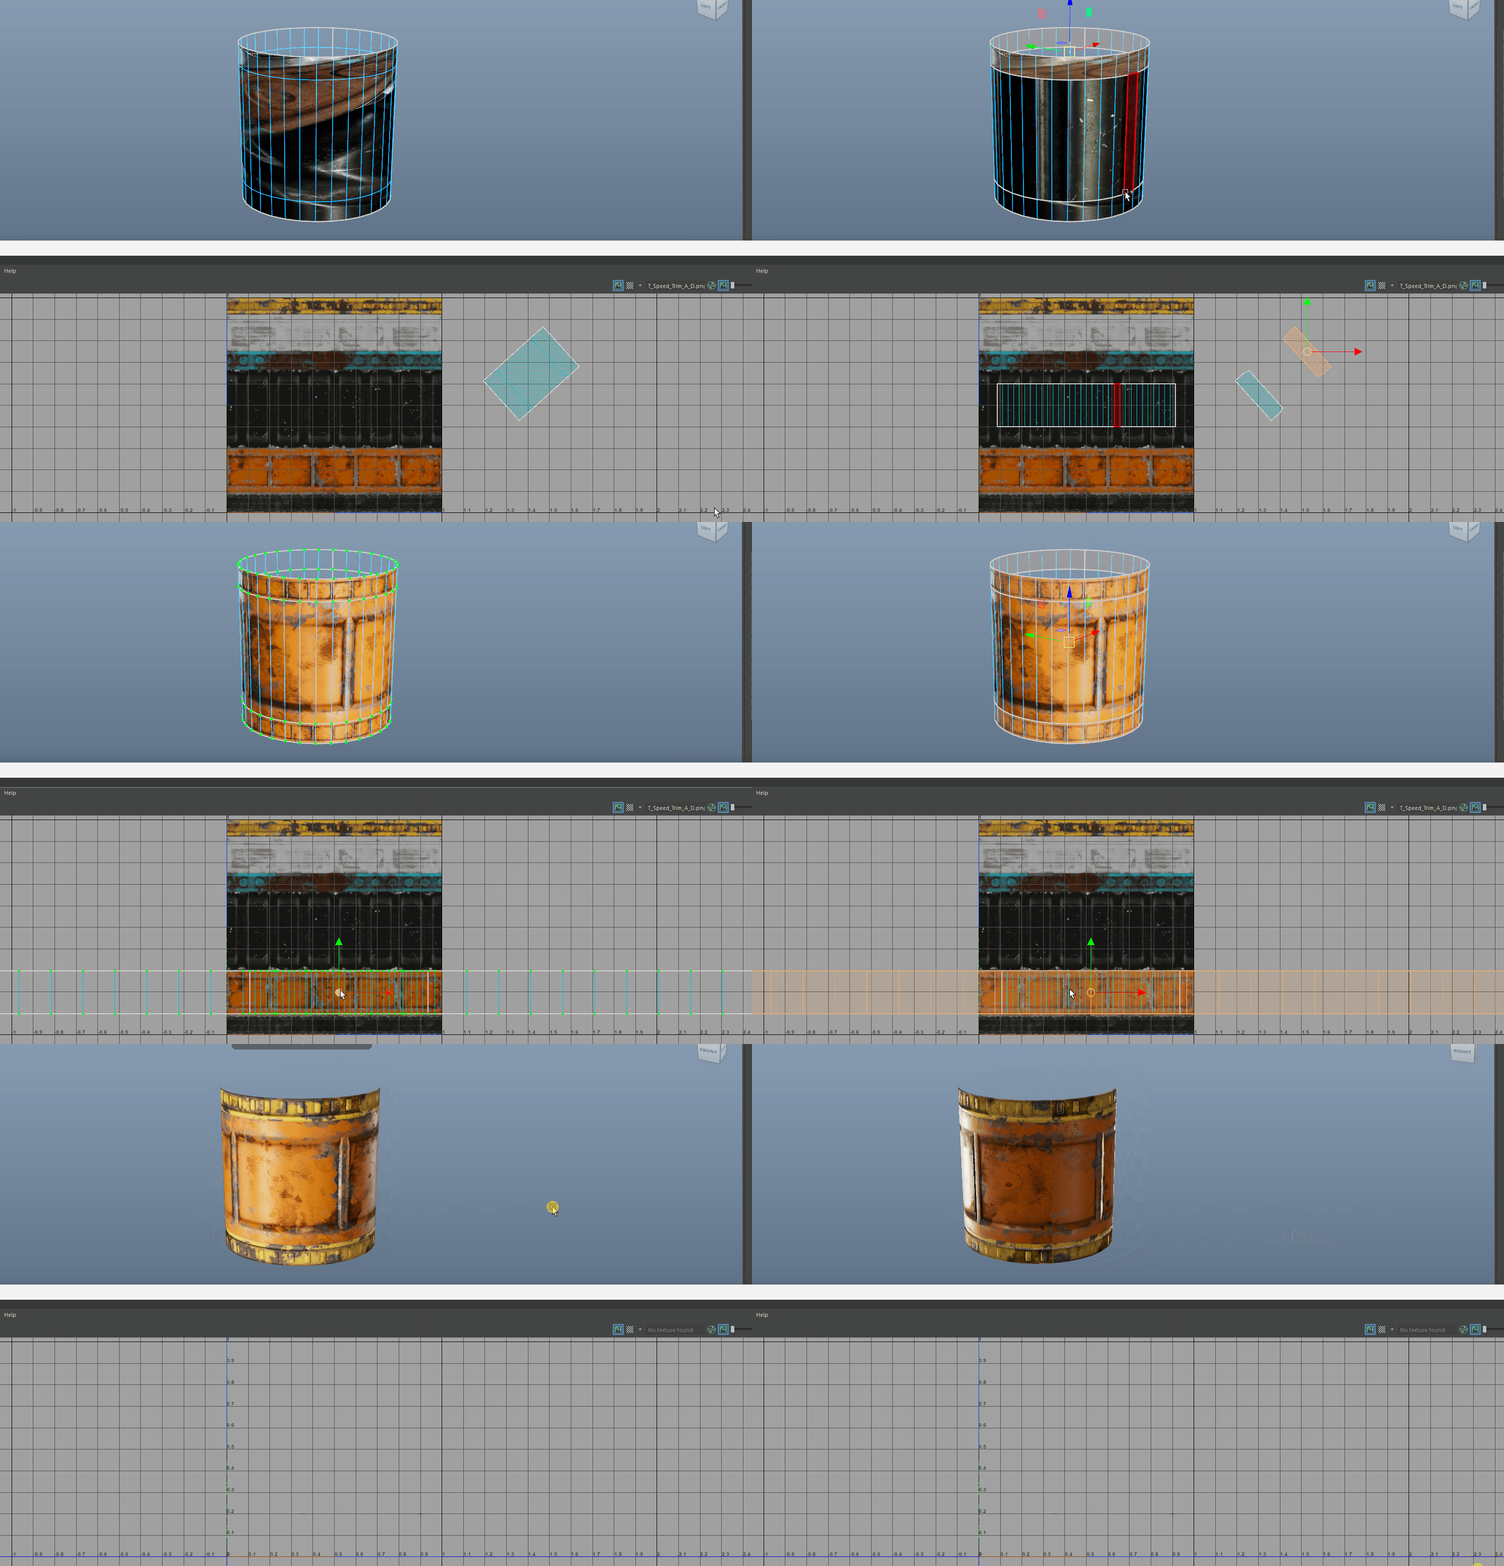
Unfolding a closed loop of faces
- If you have selected only faces and those faces loop around in a closed circuit (like the faces of a cylinder) then the tool will create an automatic seam to cut through those faces.
-
2. Faces and edges selection (user-defined)
- This operation requires the user to have faces and edges selected. The seams on your UV shell will be determined by your selected edges.
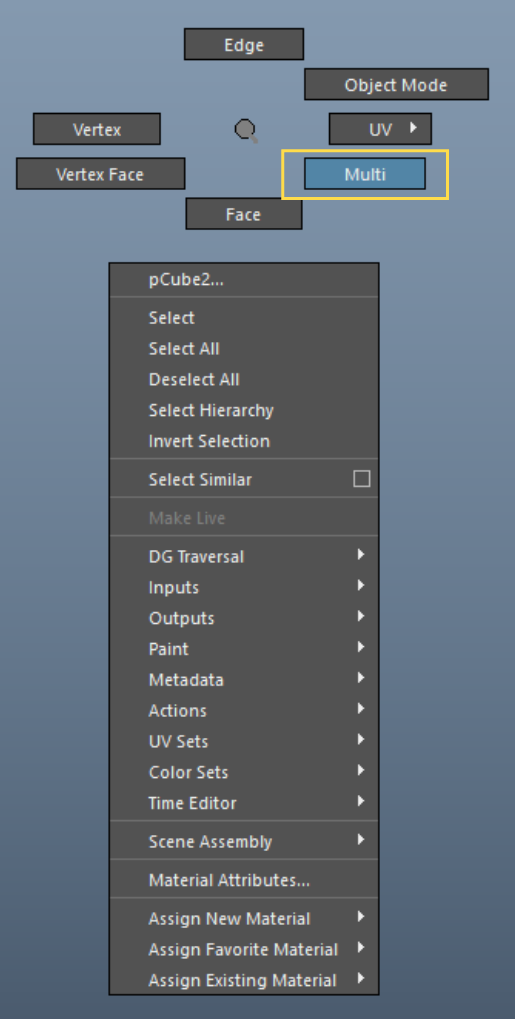
- To select multiple different components at the same time hold down right click and select Multi.
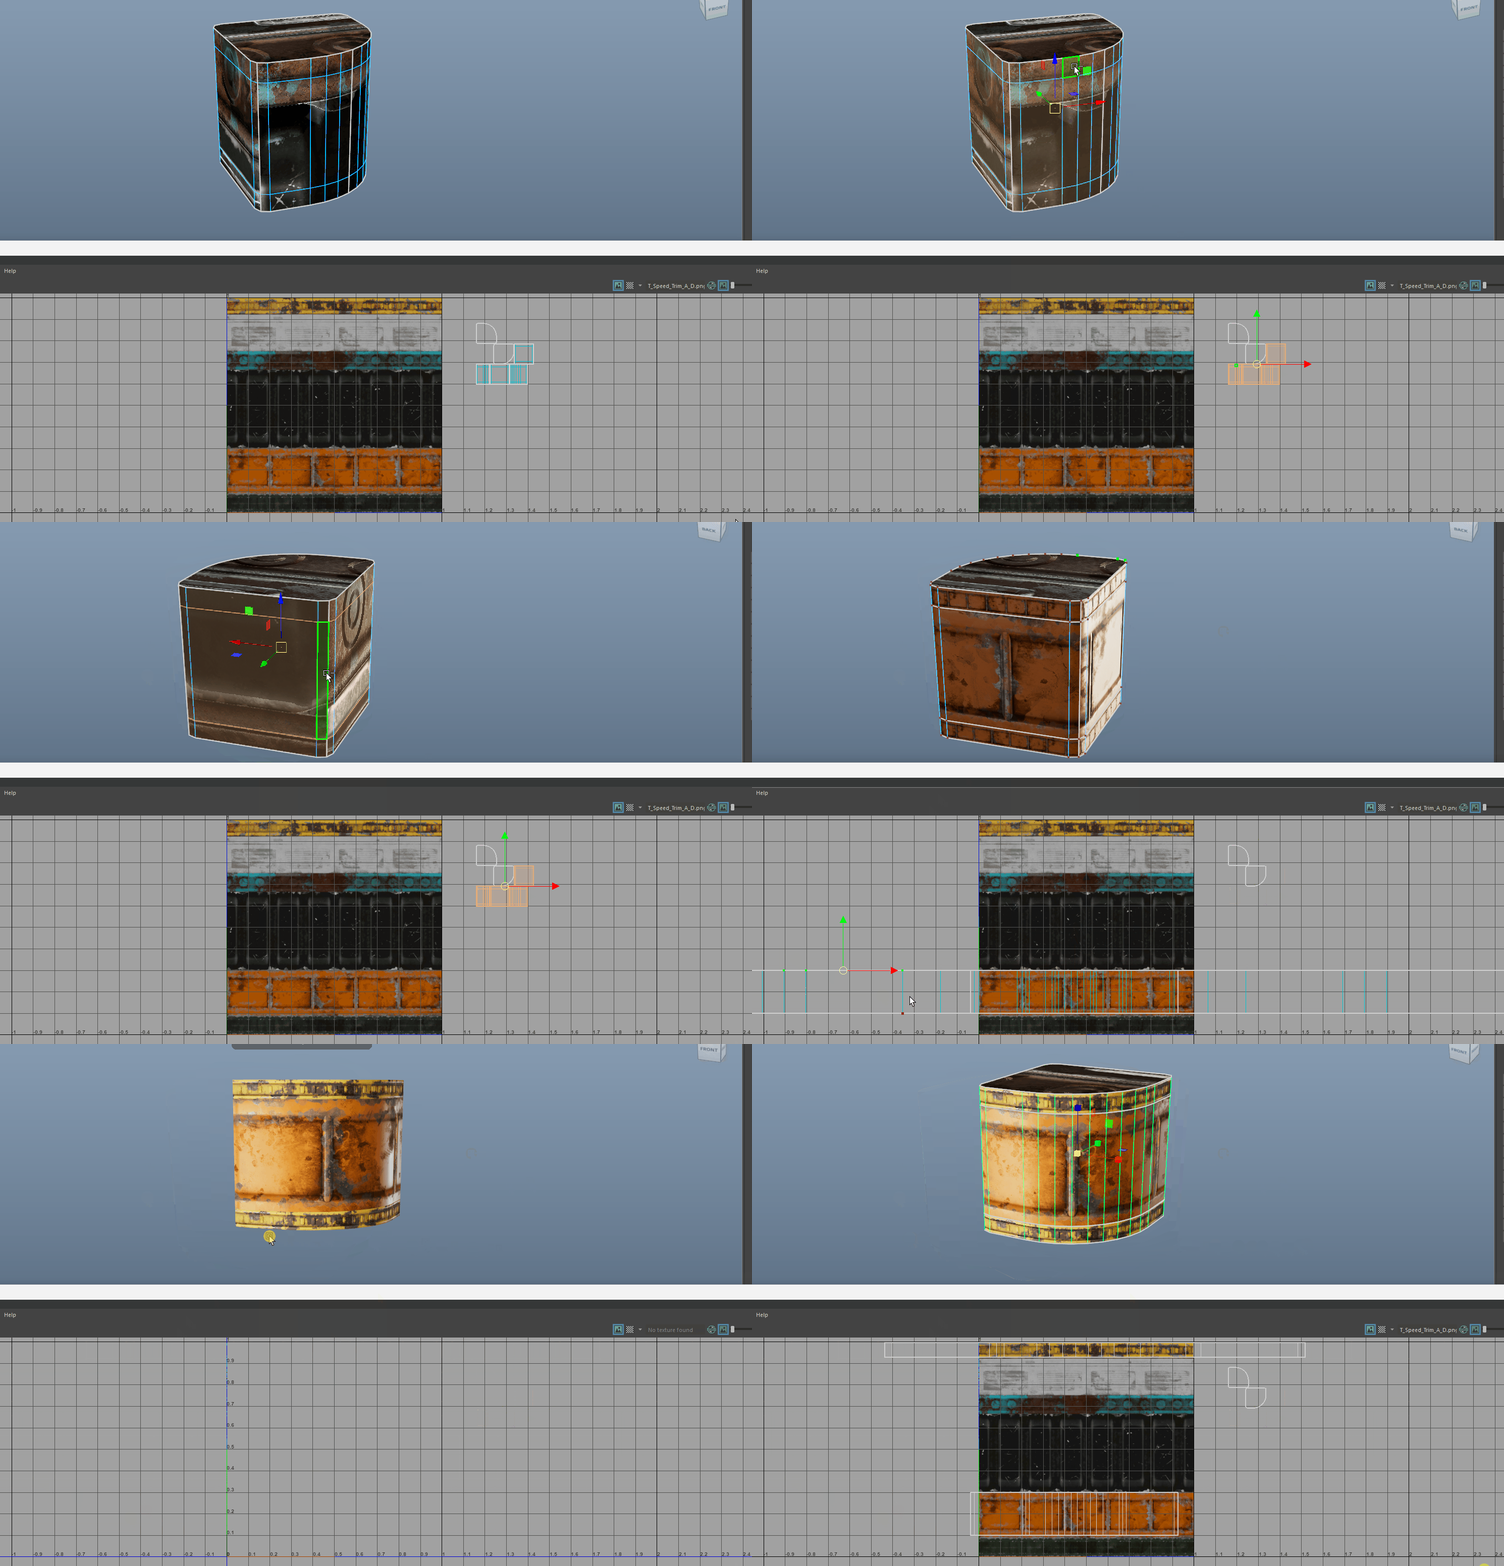
Unfolding a closed loop of faces -
3. UV selection (for aligning to existing shells).
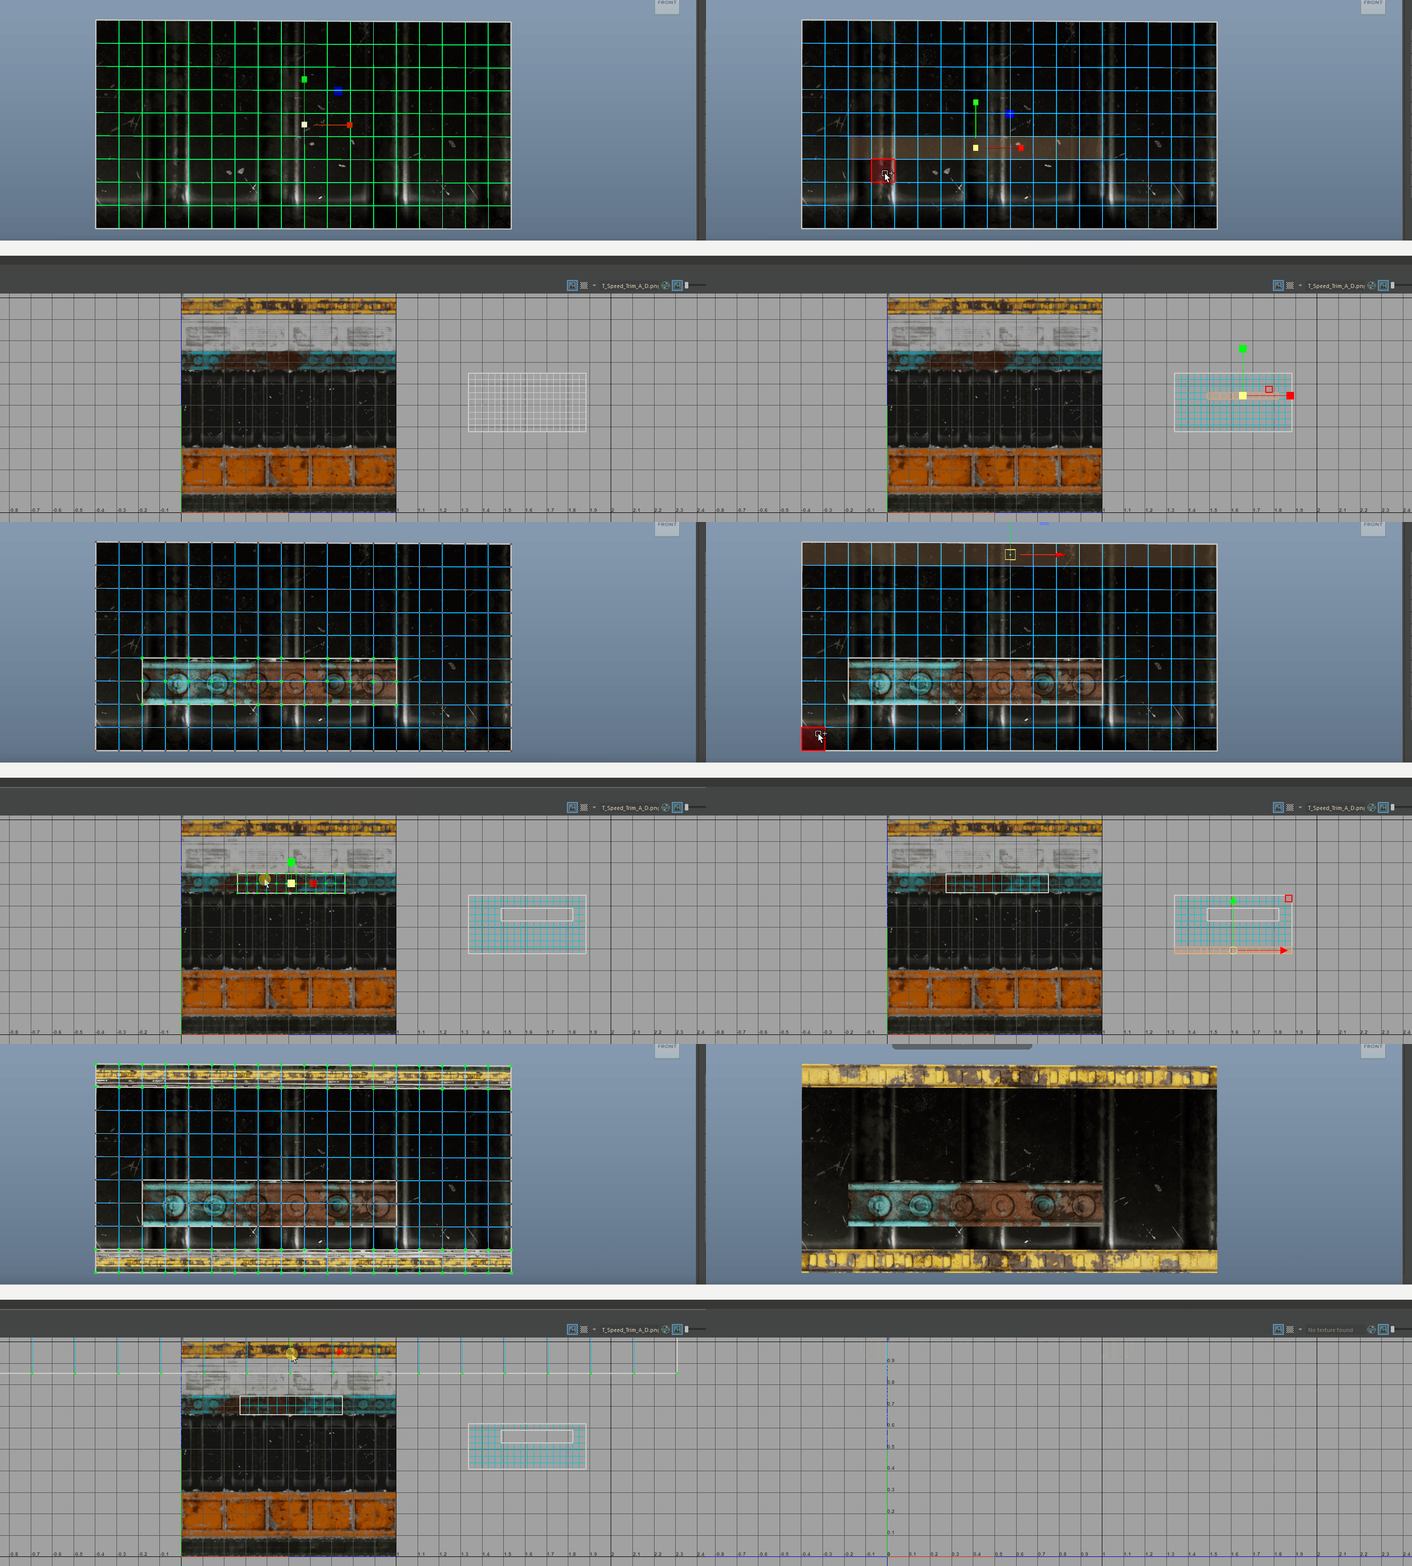
- Automatic UV Selection: Once your trims are unfolded, your selection automatically switches to UV points—preparing your shells for quick alignment.
- With those points selected, select a UV point on any target shell. The tool will automatically orient (vertically or horizontally), scale, and move your unfolded trim to match the target's size and placement.
- You are not constrained to moving one shell at a time. Select multiple shells and align them to the last shell UVs you selected.
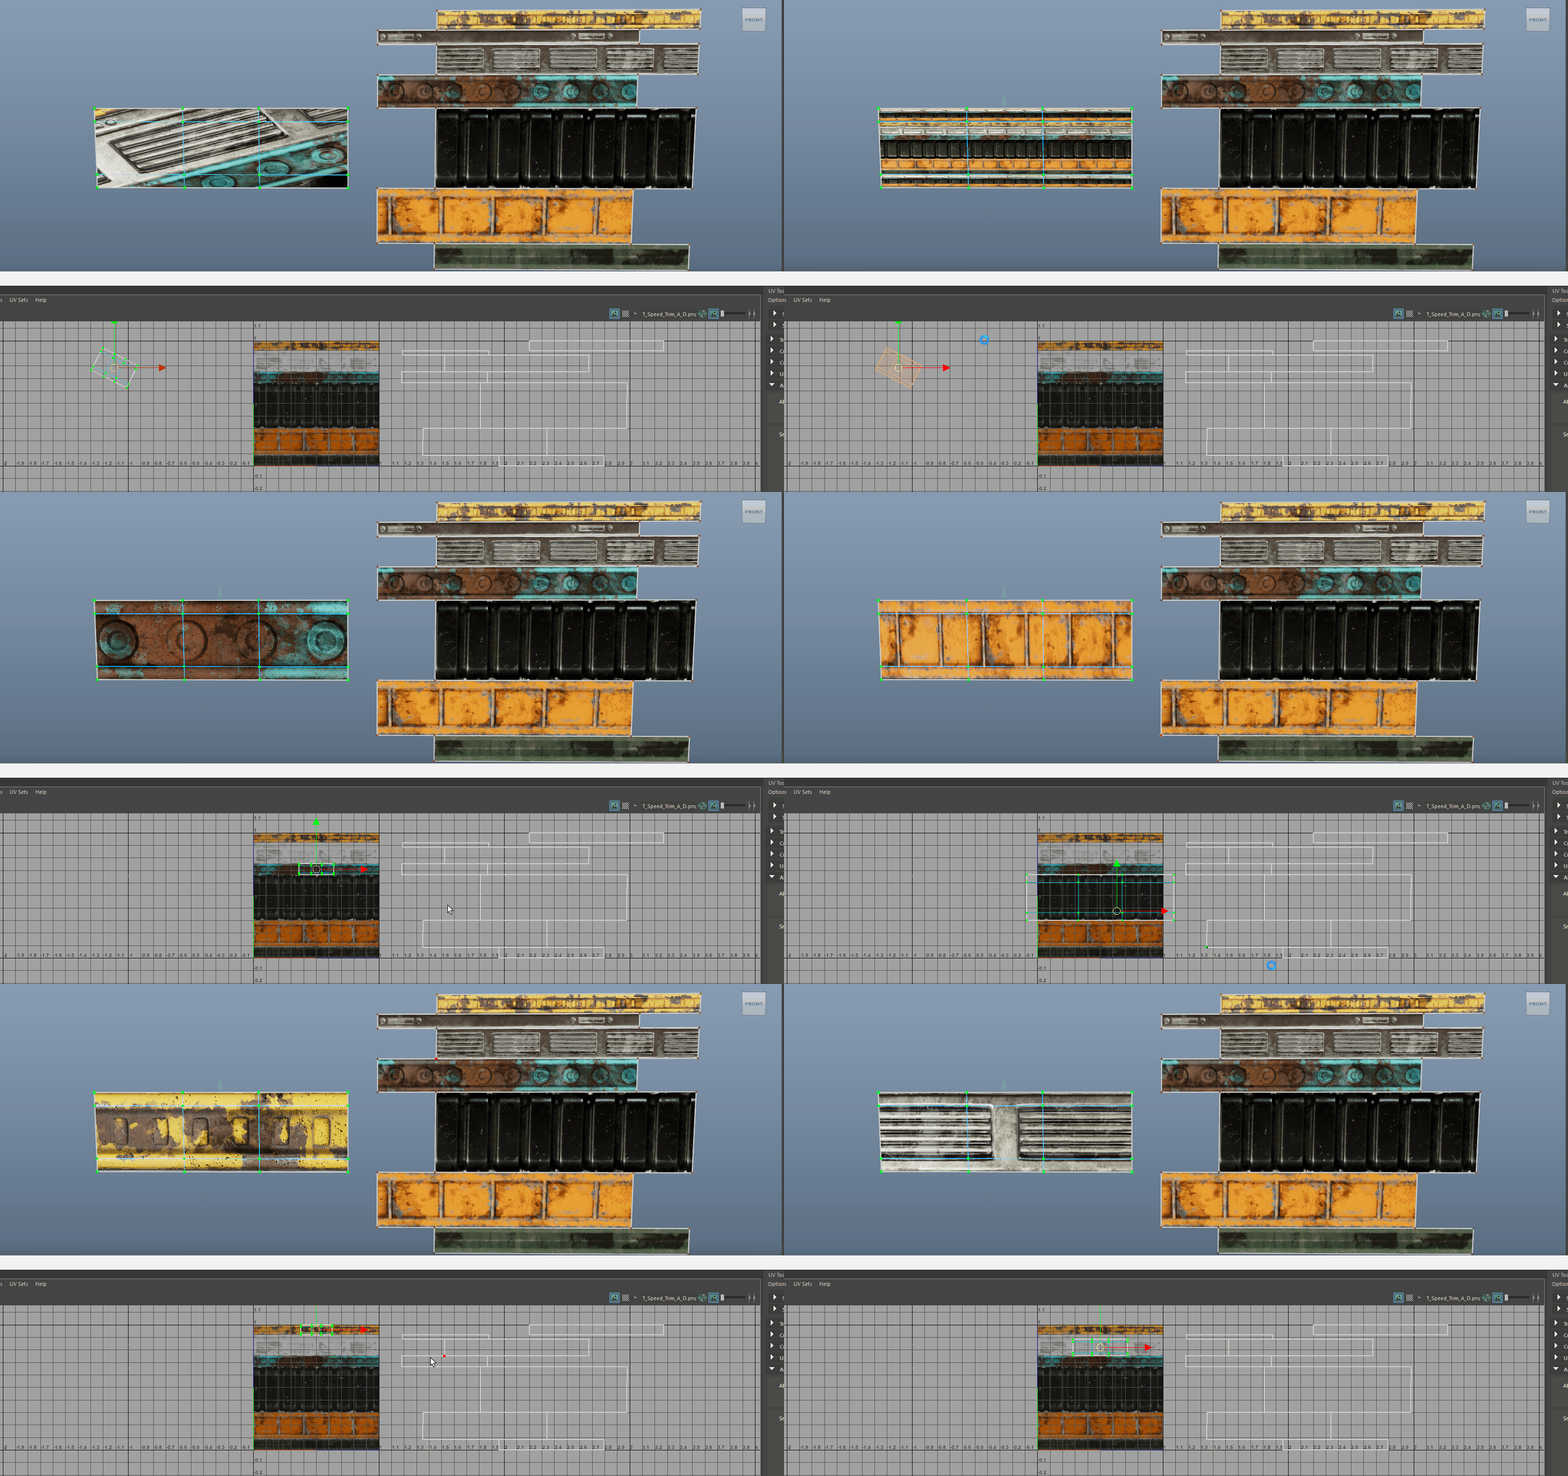
Aligning trim sheets - When Auto-Orient checkbox is checked, the tool compares bounding boxes between your source and target UV shells.
- If your Target UV shell's bounding box is longer on the V axis and your Source UV Shell bounding box is longer in the U axis, the tool knows your source is vertical and will rotate that source uv shells to match that orientation of the target.
- If your Target UV shell's bounding box is longer on the V axis and your Source UV Shell bounding box is longer in the U axis, the tool knows your source is vertical and will rotate that source uv shells to match that orientation of the target.
- When that checkbox is unchecked, the tool aligns your source shells to the U or V bounding box of your target shell. No automatic rotation or bounding box calculation happening.
- Checking or Unchecking the checkbox impacts the way your Hokey behaves. Hotkeys will always look if the checkbox is checked and perform the necessary actions. So keep that in mind.
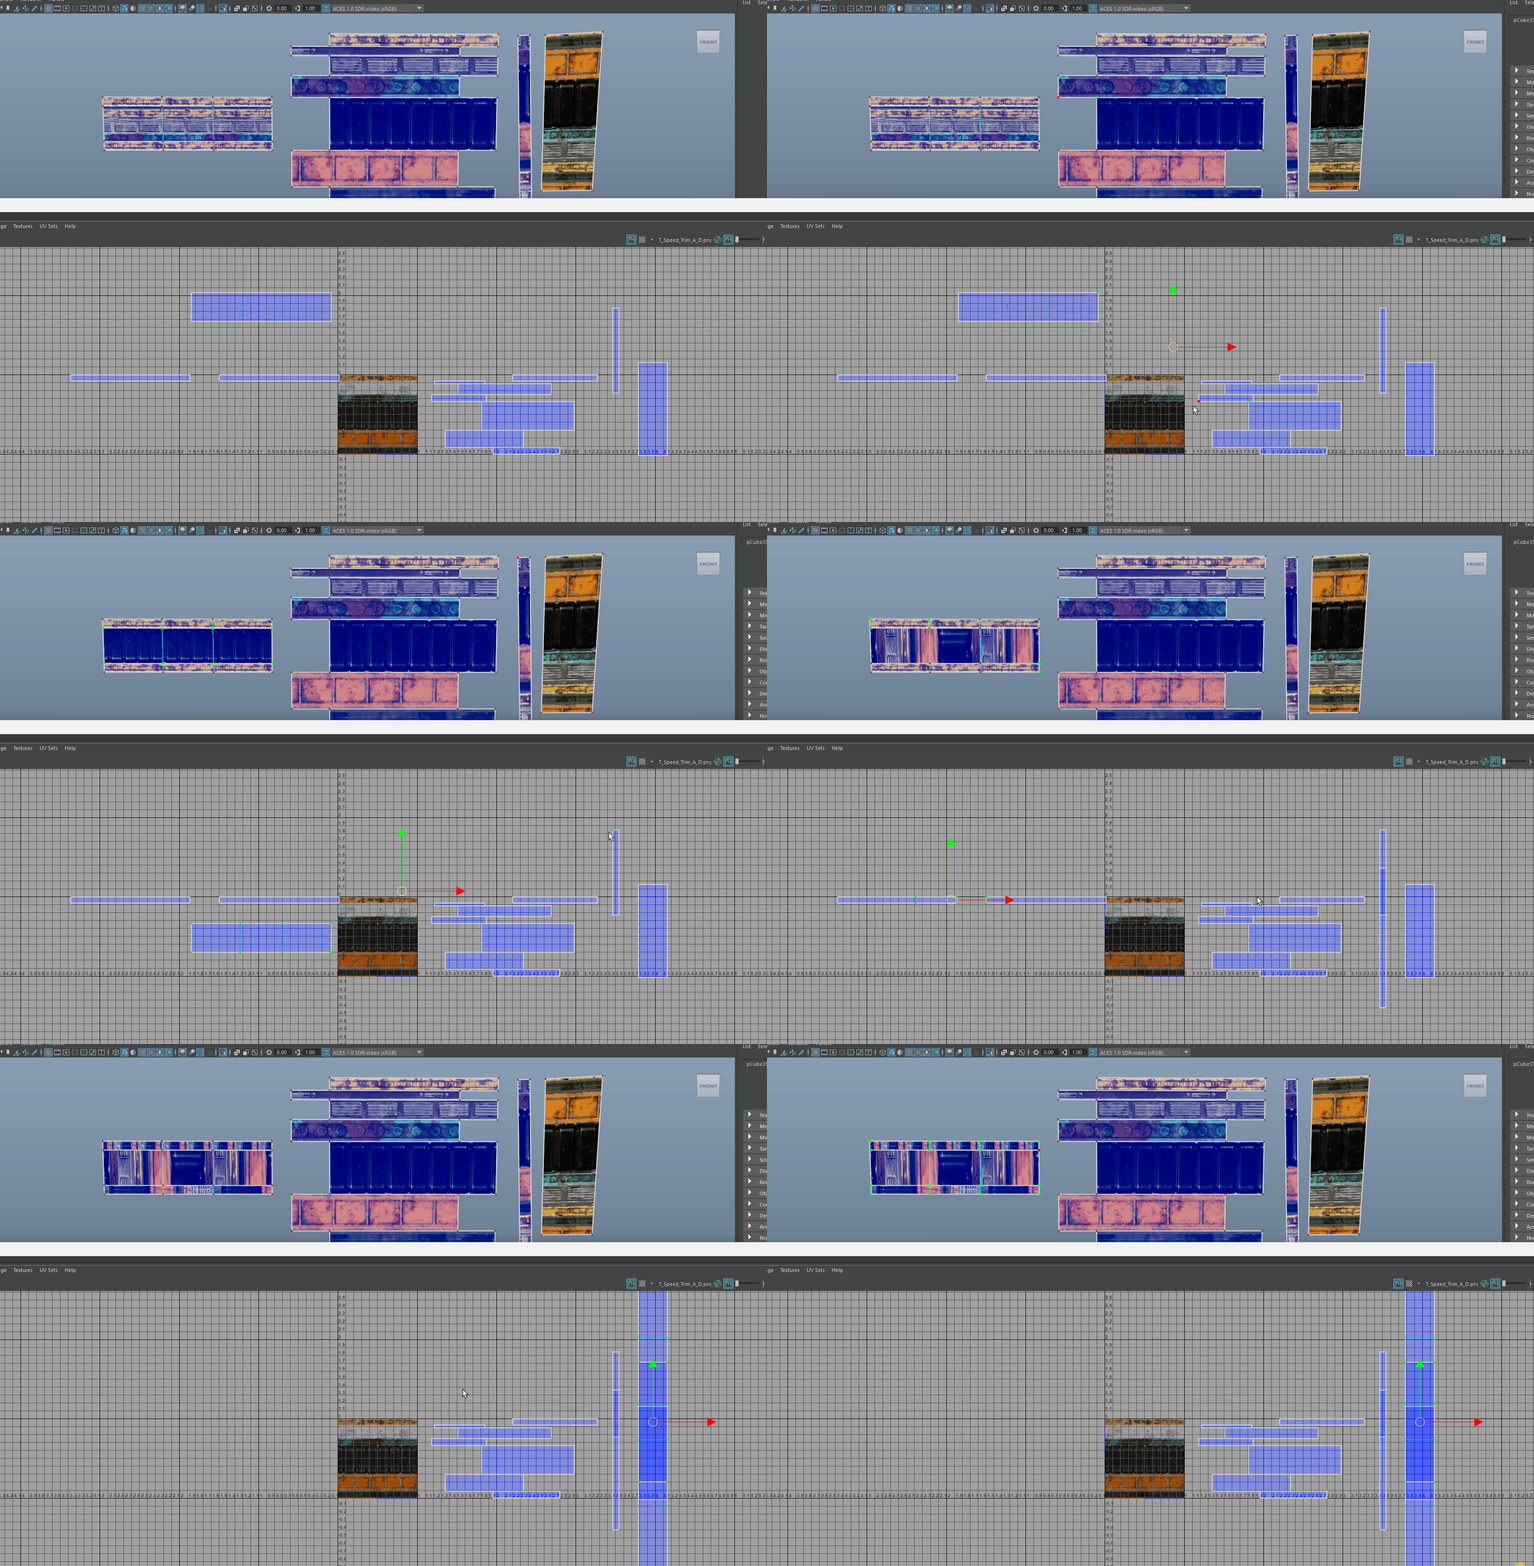
Aligning horizontally/vertically - After the operation the tool will unfold your UV in a gridified manner. The spacing (rows and columns) of your UV shell are entirely dependent on your topology.
- The tool will unfold your selection horizontally and place all shells in the center of the 0-1 UV space so all shells occupy the same space.
- This is done so users can map multiple selections of trims at the same time.
Info - Further details
- You don't have to have the entire shell selected, a single uv from the source to the target will suffice (same rule applies for the target as well).
- The tool will deselect the target UVs after the operation so you can re-map your shell to another trim if needed.
- If you have multiple UV's selected the tool will recognise the last selected as the target.
- Works with multiple source UV trim shells from different selected objects.
-
Aligning Shells directly from the viewport
- It is even possible to align to existing trims directly from the viewport - without opening the UV Editor. Simply select a face, convert that face to uv then select a target uv from a trim you wish to match.
Converted Face + UV
- This is the only way you can work within the viewport.
- Although selecting 2 faces and converting those to uv will work, Maya cannot track the selection order thus failing to correctly map the correct trim sheet.
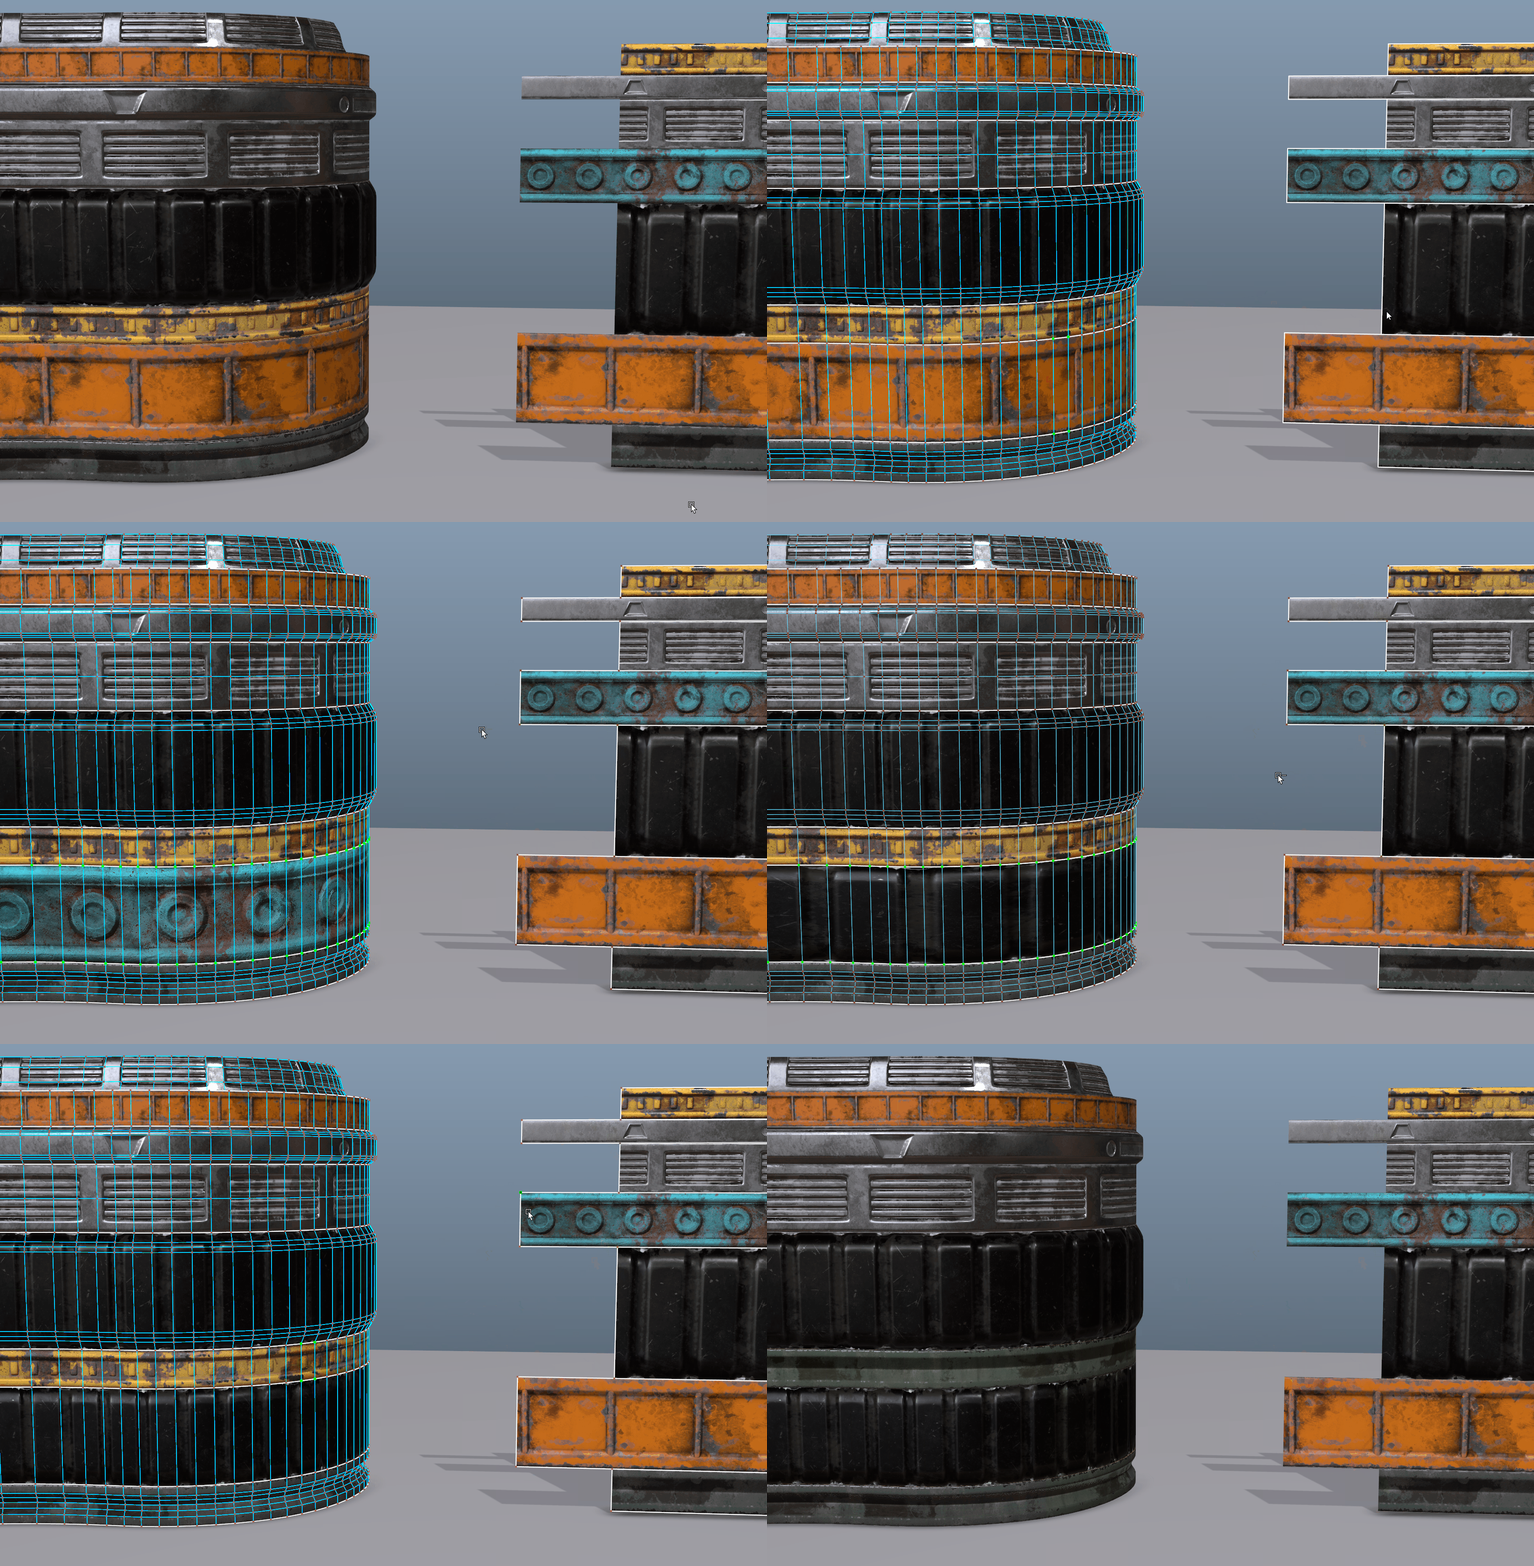
Align shells directly from viewport 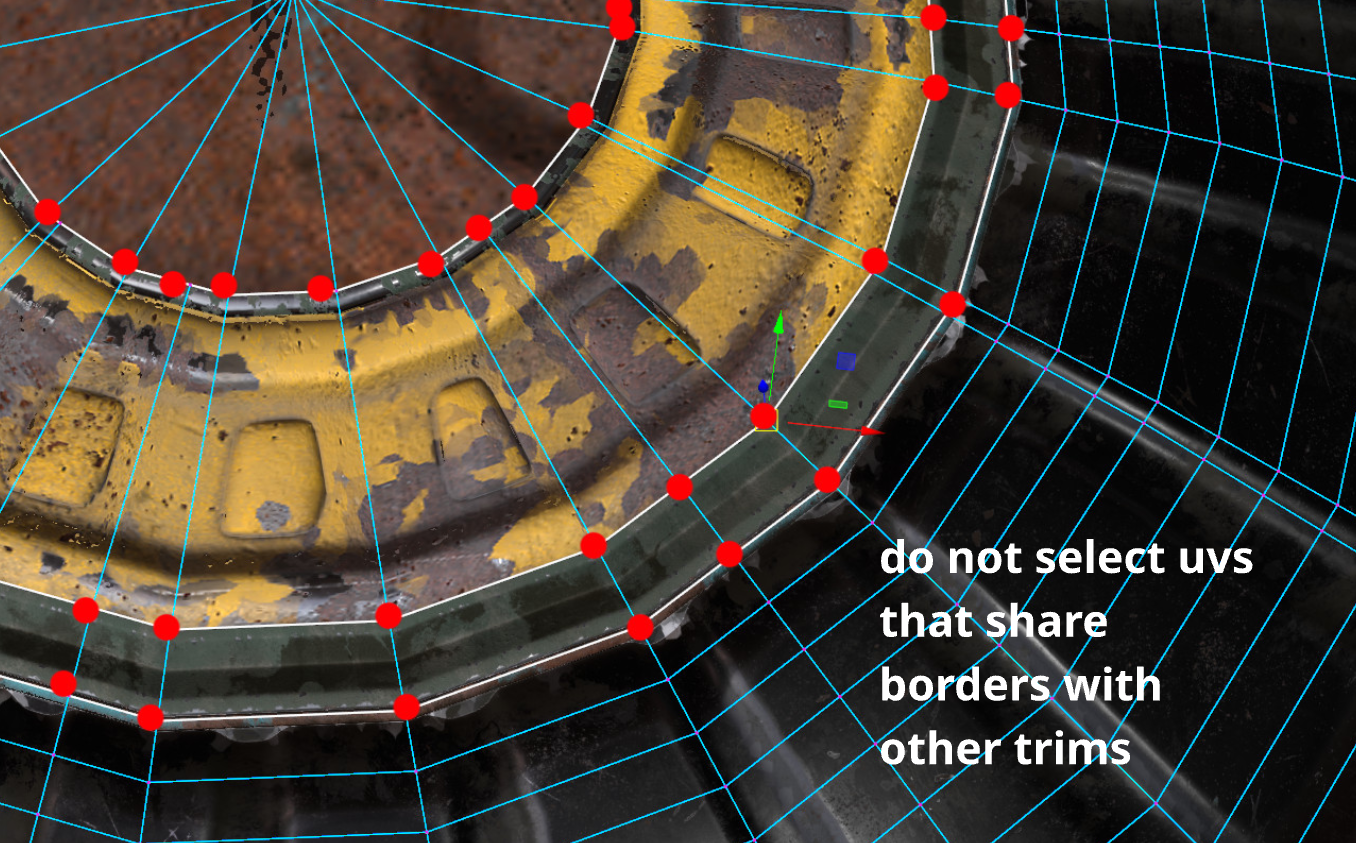
Important - Aligning from viewport
- Be careful when converting your selection to uv when working from the viewport.
- When converting vertices or edges that share border edges you will also select uvs that are shared between shells.
- This will mess up the number of shells to be aligned and possibly their orientation.
-
UI Button Functionality
Unfold/Align U and Unfold/Align V : When having faces (and edges) selected these buttons will unfold your trims Horizontally and Vertically.
The difference the UI makes is with how the Orientation between the Source and Target Shells happen.
If Auto-Orient is checked the tool calculates the bounding boxes between the source and target UV shells. Then rotates if necessary and moves and scales the source uvs to match the target.
Note - Equal Bounding Boxes
- In cases where the bounding box of your target UV shell is same for the U and V axis, the tool will align your UVs on the U boundaries.
- This will only happen when Auto-Orient is checked.
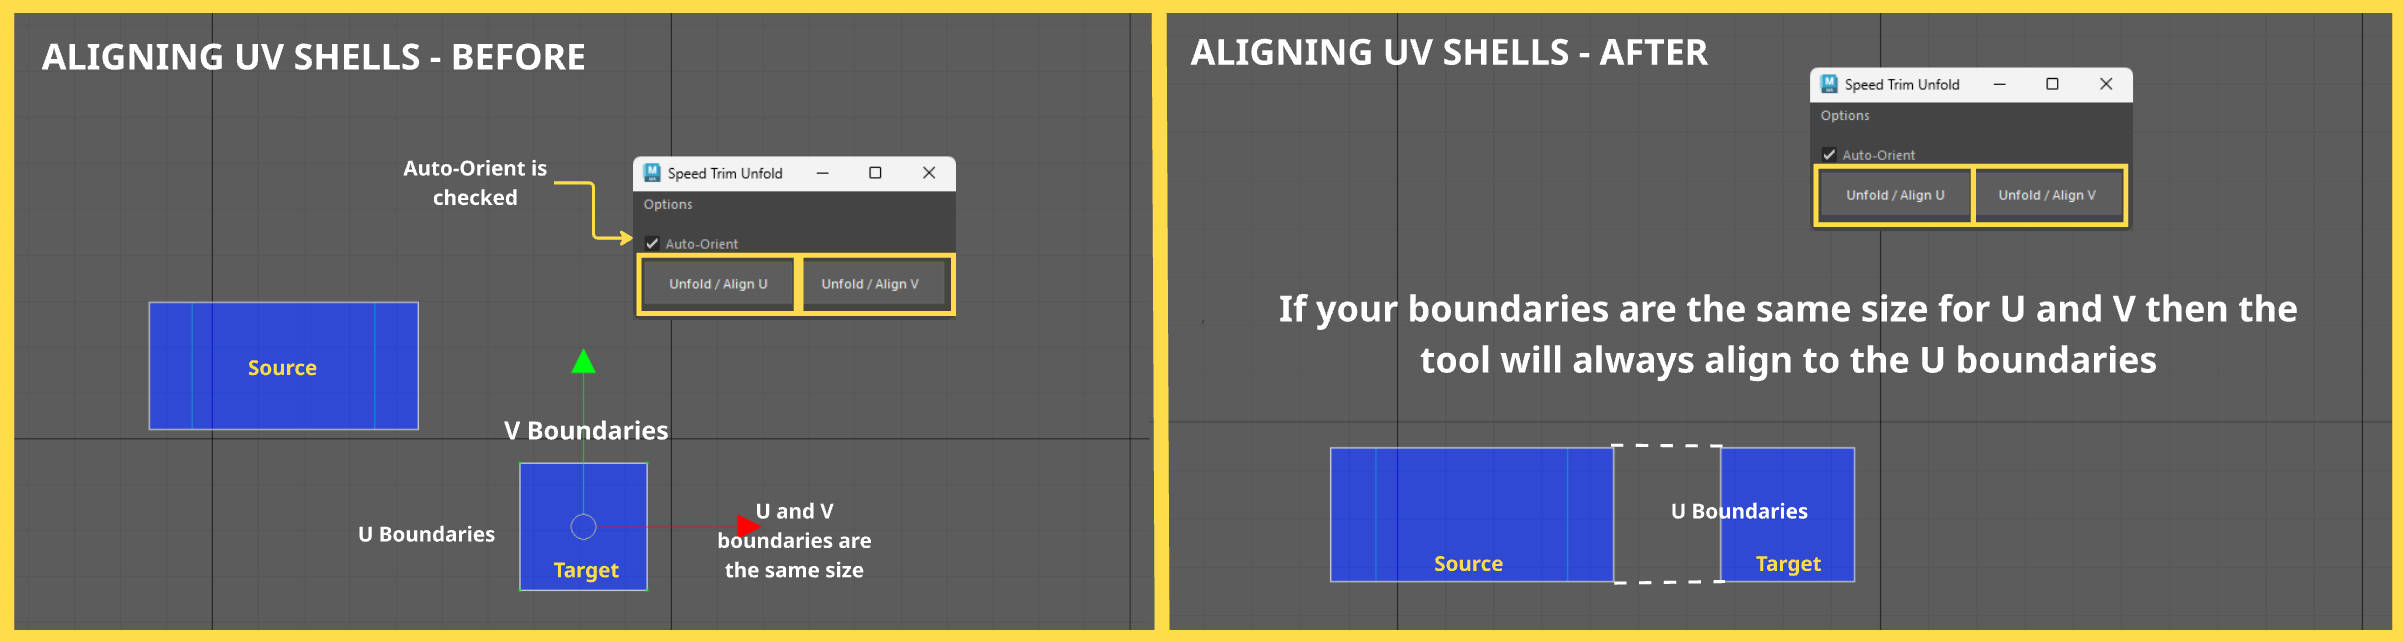
If Auto-Orient is un-checked then the tool does not calculate any bounding box or rotate any UV shell. It just takes into account each sources current UV shell layout and moves and scales it to either the U (if Unfold/Align U) is clicked or V (if Unfold/Align V) button is clicked.
Tip - Hotkey
- The state of the Auto-Orient checkbox is stored in Maya when using the Hotkey.
- It is designed that way so you can customize the behavior of the tool and adjust accordingly.
- Since trim sheets are usually long thin strips of UV Shells, it is recommended to use the Unfold/Align U button as a hotkey with the Auto-Orient checkbox checked, this will ensure your UVs will be unfolded in the U direction and aligned to the U or V boundaries of your target UV shells (depends on which side of the targets bounding box UV shell is longer).
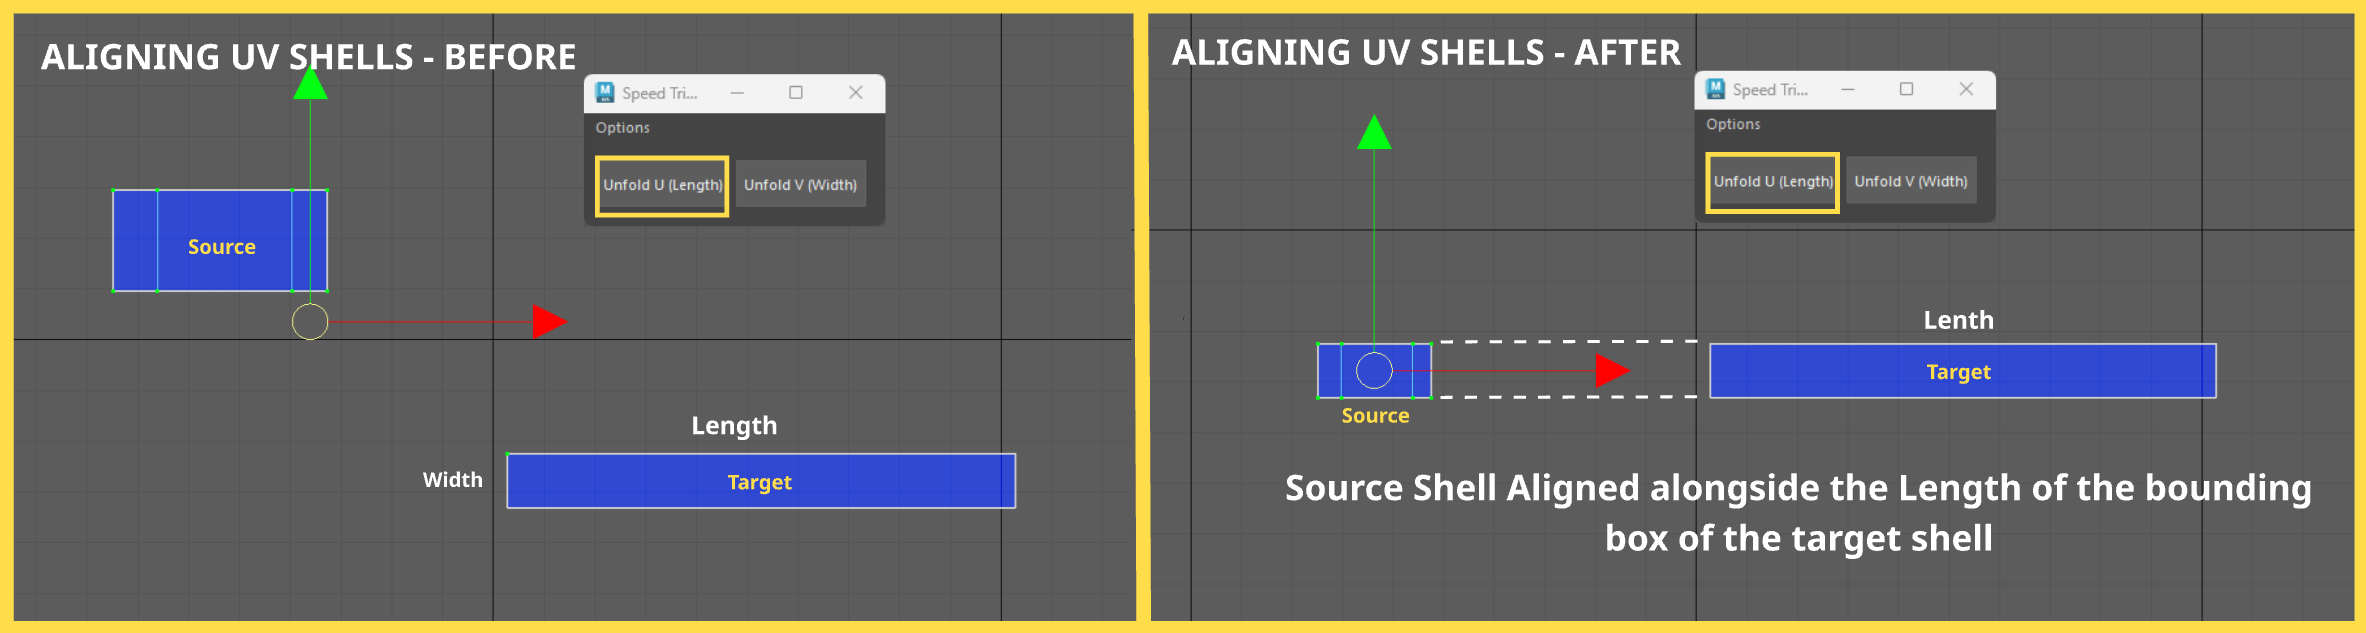
When the Auto-Orient checkbox is unchecked.
-
Clicking on the Unfold/Align U button: will unfold your selected (source) Trim sheets alongside the U direction of the targets bounding box.
-
Clicking on the Unfold/Align V button: will unfold your selected (source) Trim sheets alongside the V direction of the targets bounding box.
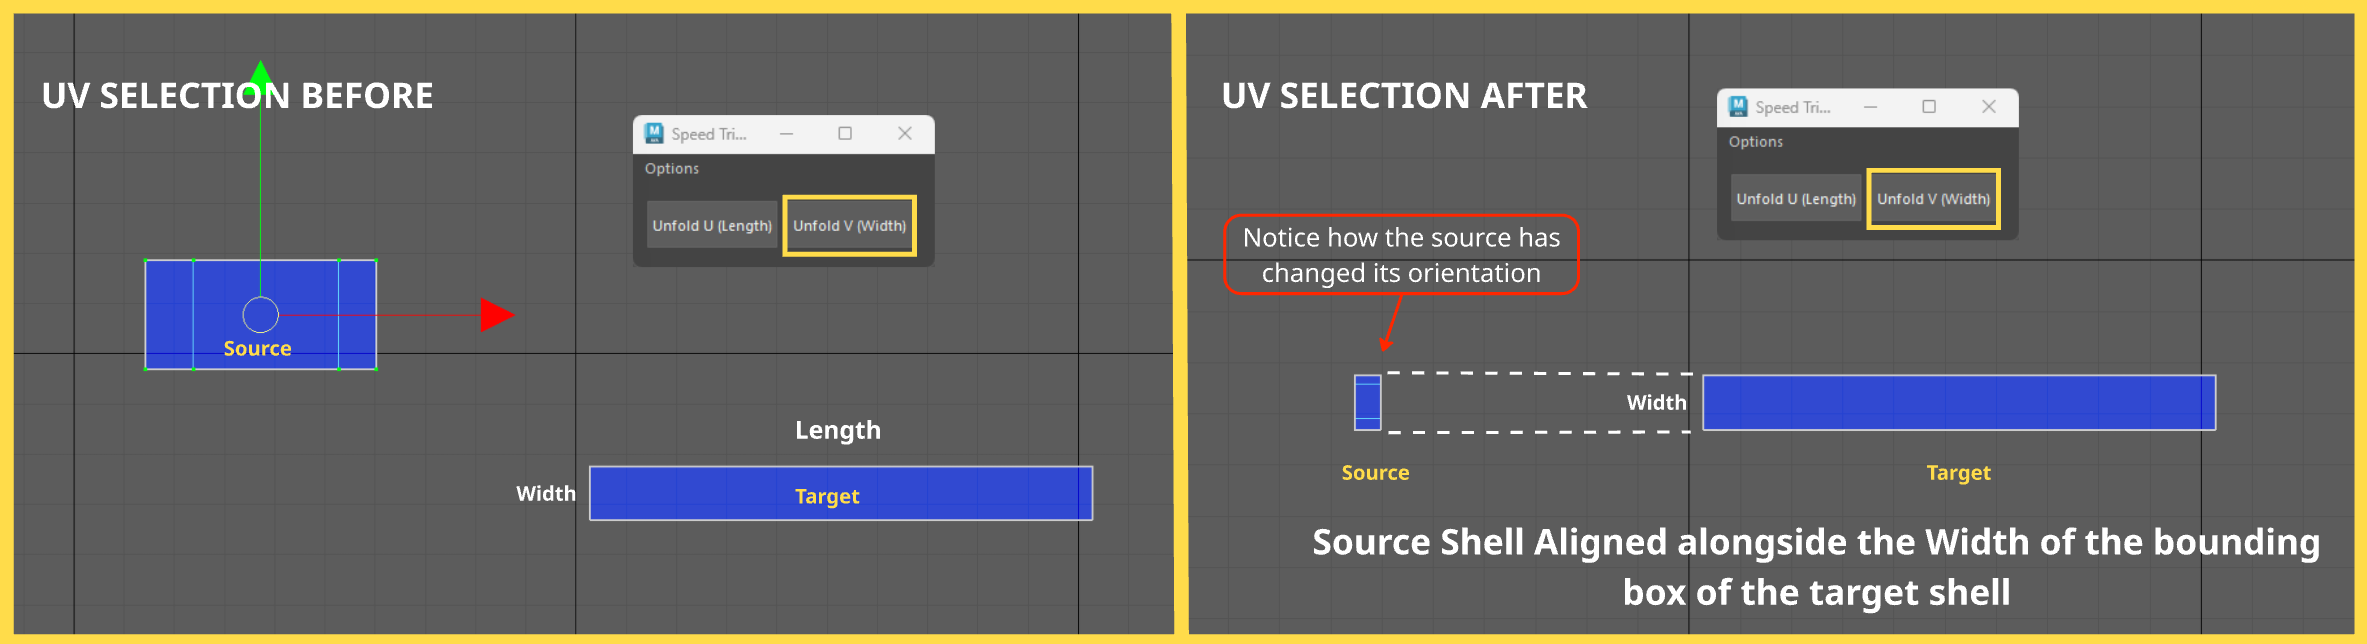
-
Orientation of Source matters when aligning.
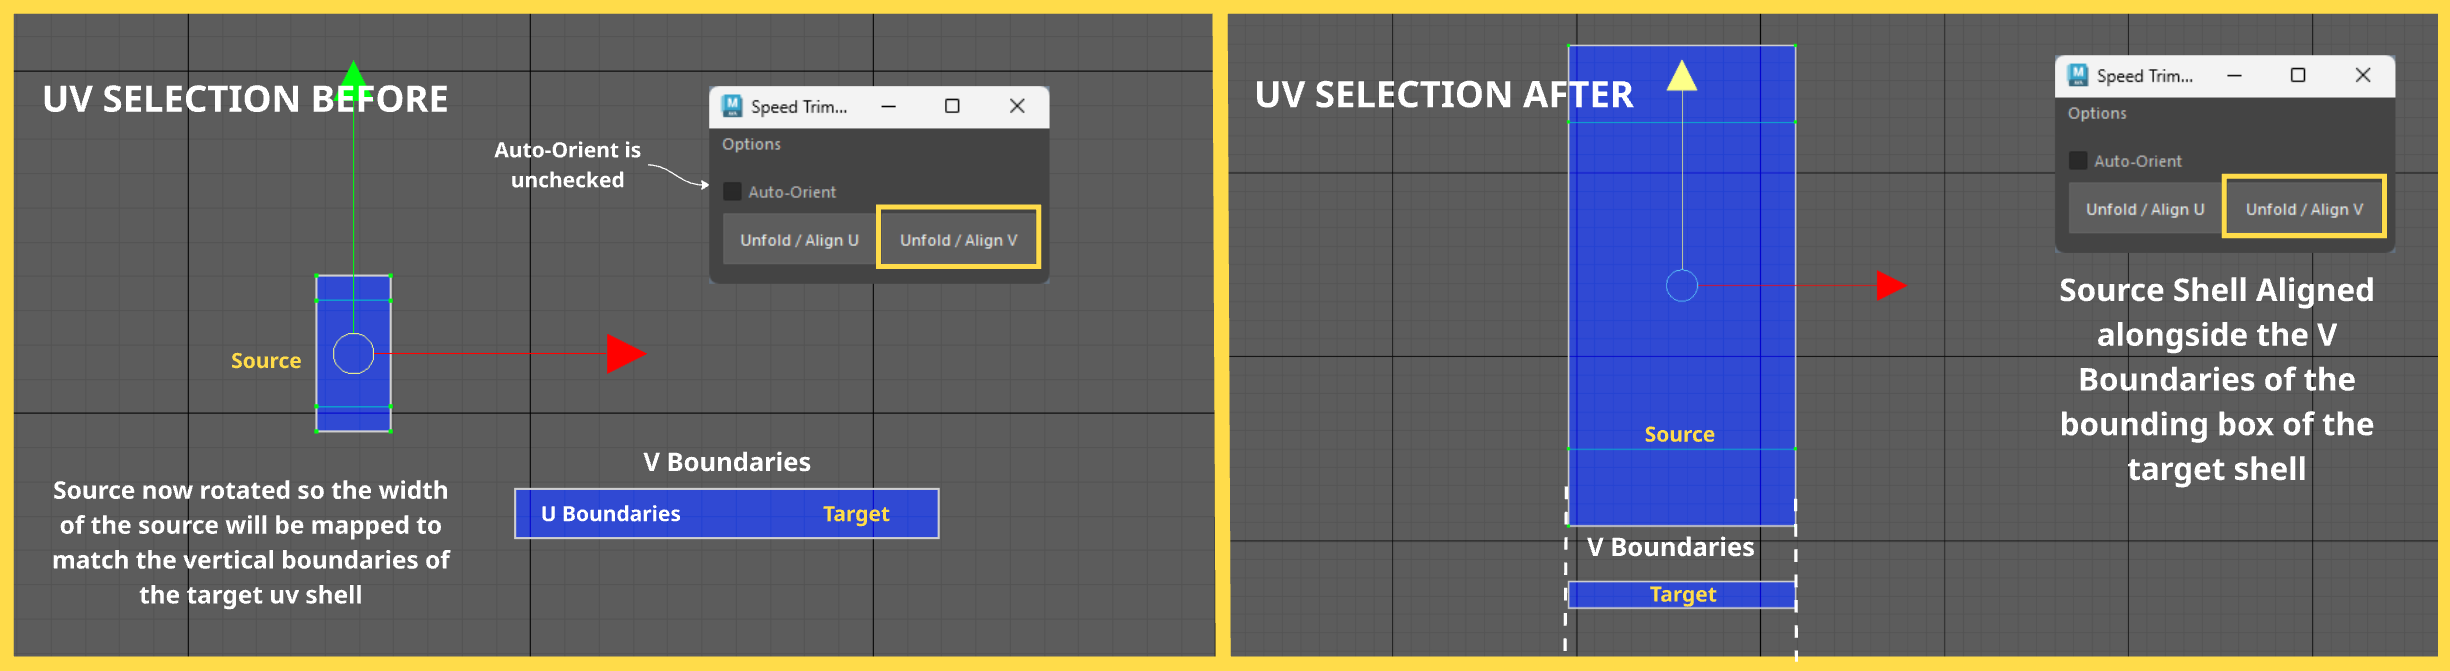
-
Here's a basic demonstration:
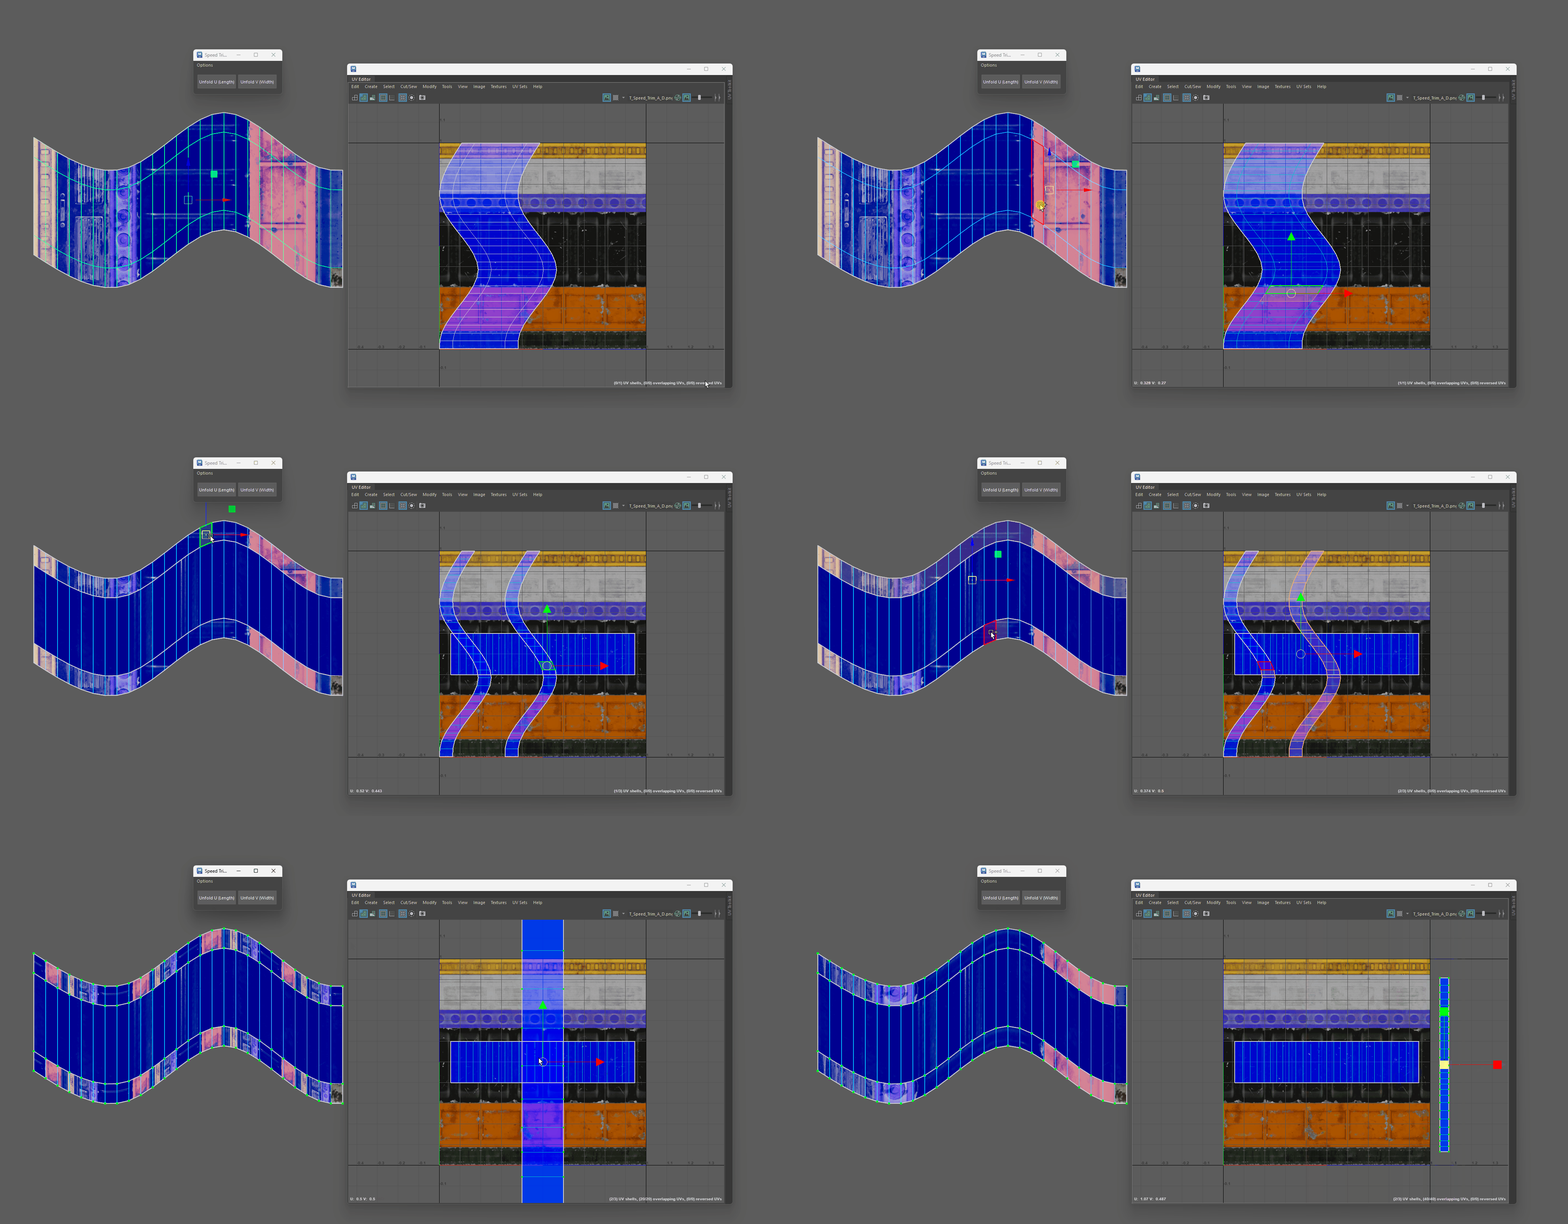
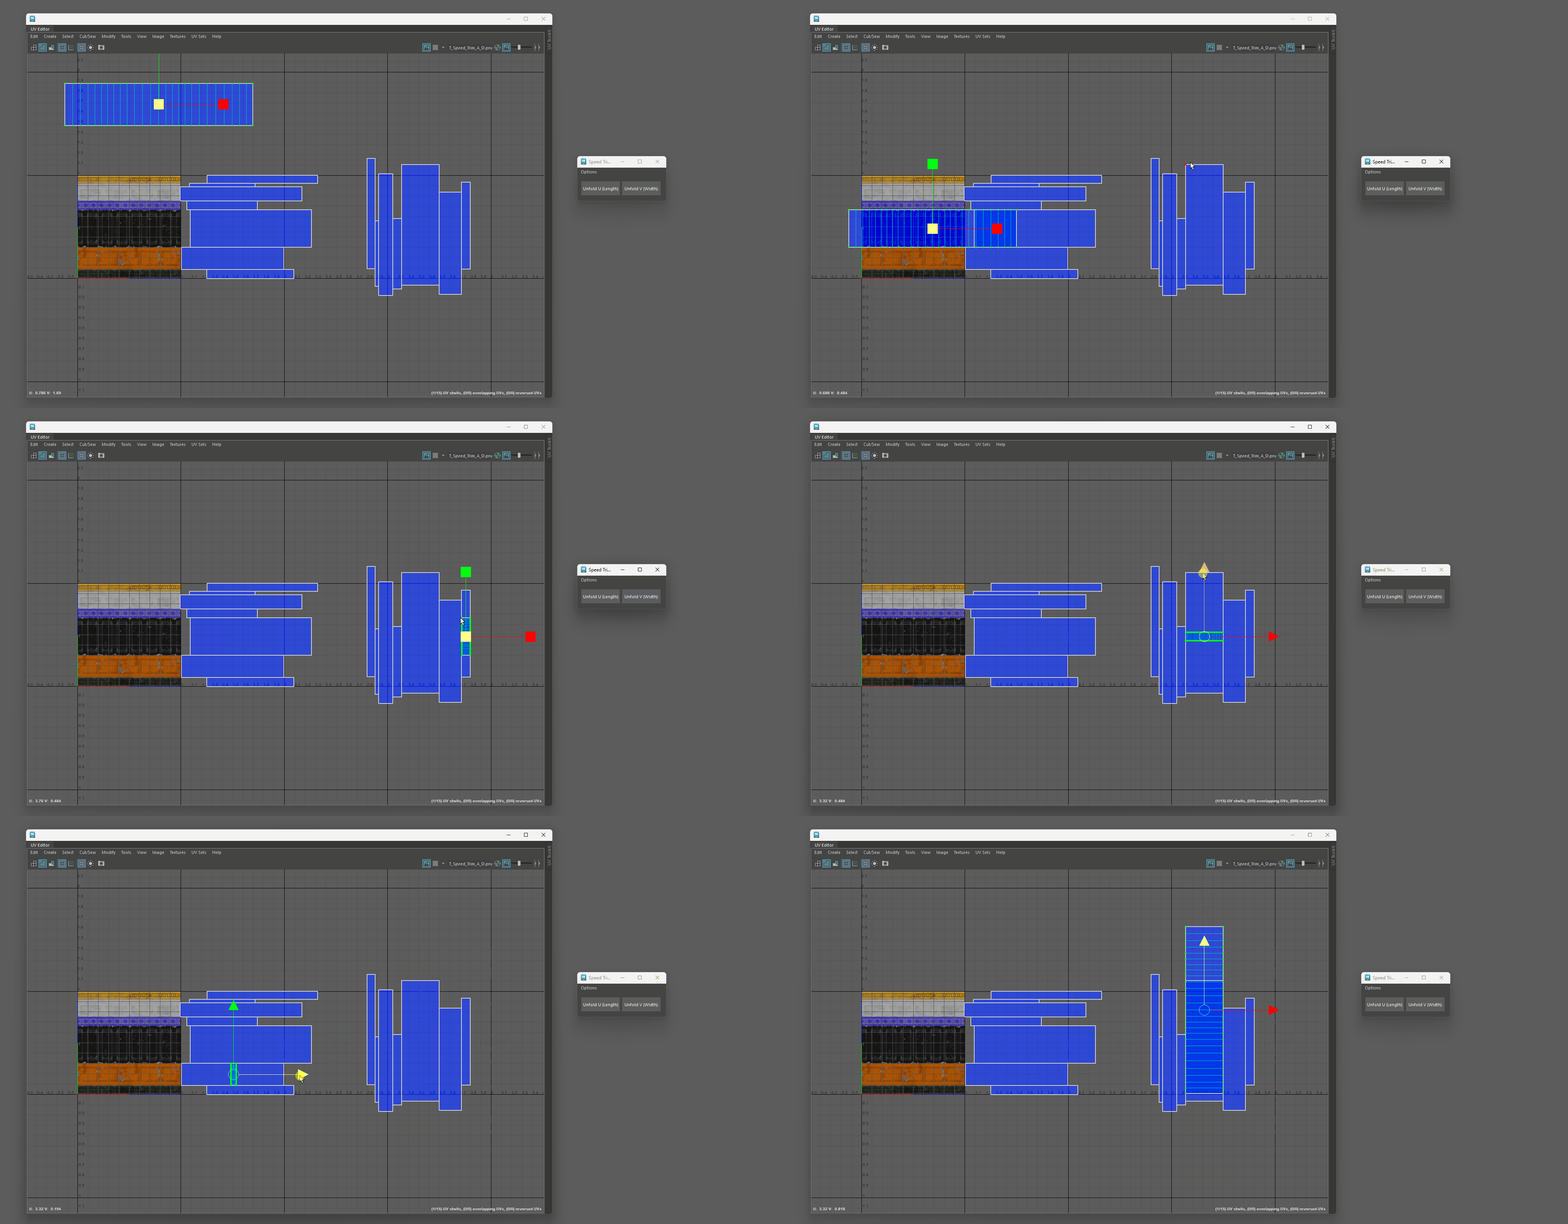
Rules
The tool will not work if you have only objects selected, it requires component selections.
-
1. Selection
- Selection:
- The tool only accepts Face, Face/Edge and UV selections.
- Selection:
-
2. Topology
- No n-gons.
- If any detected the tool will abort and select the ngons instead.
- No triangles on your face selection as the tool unitizes each face.
- If any detected, your uv shell will fail to be stitched in a gridified way.
- Avoid irregular/jagged face selections (they usually mess up the spacing, and orientation of your uv shell).
- Ensure you have square or rectangle face selections.
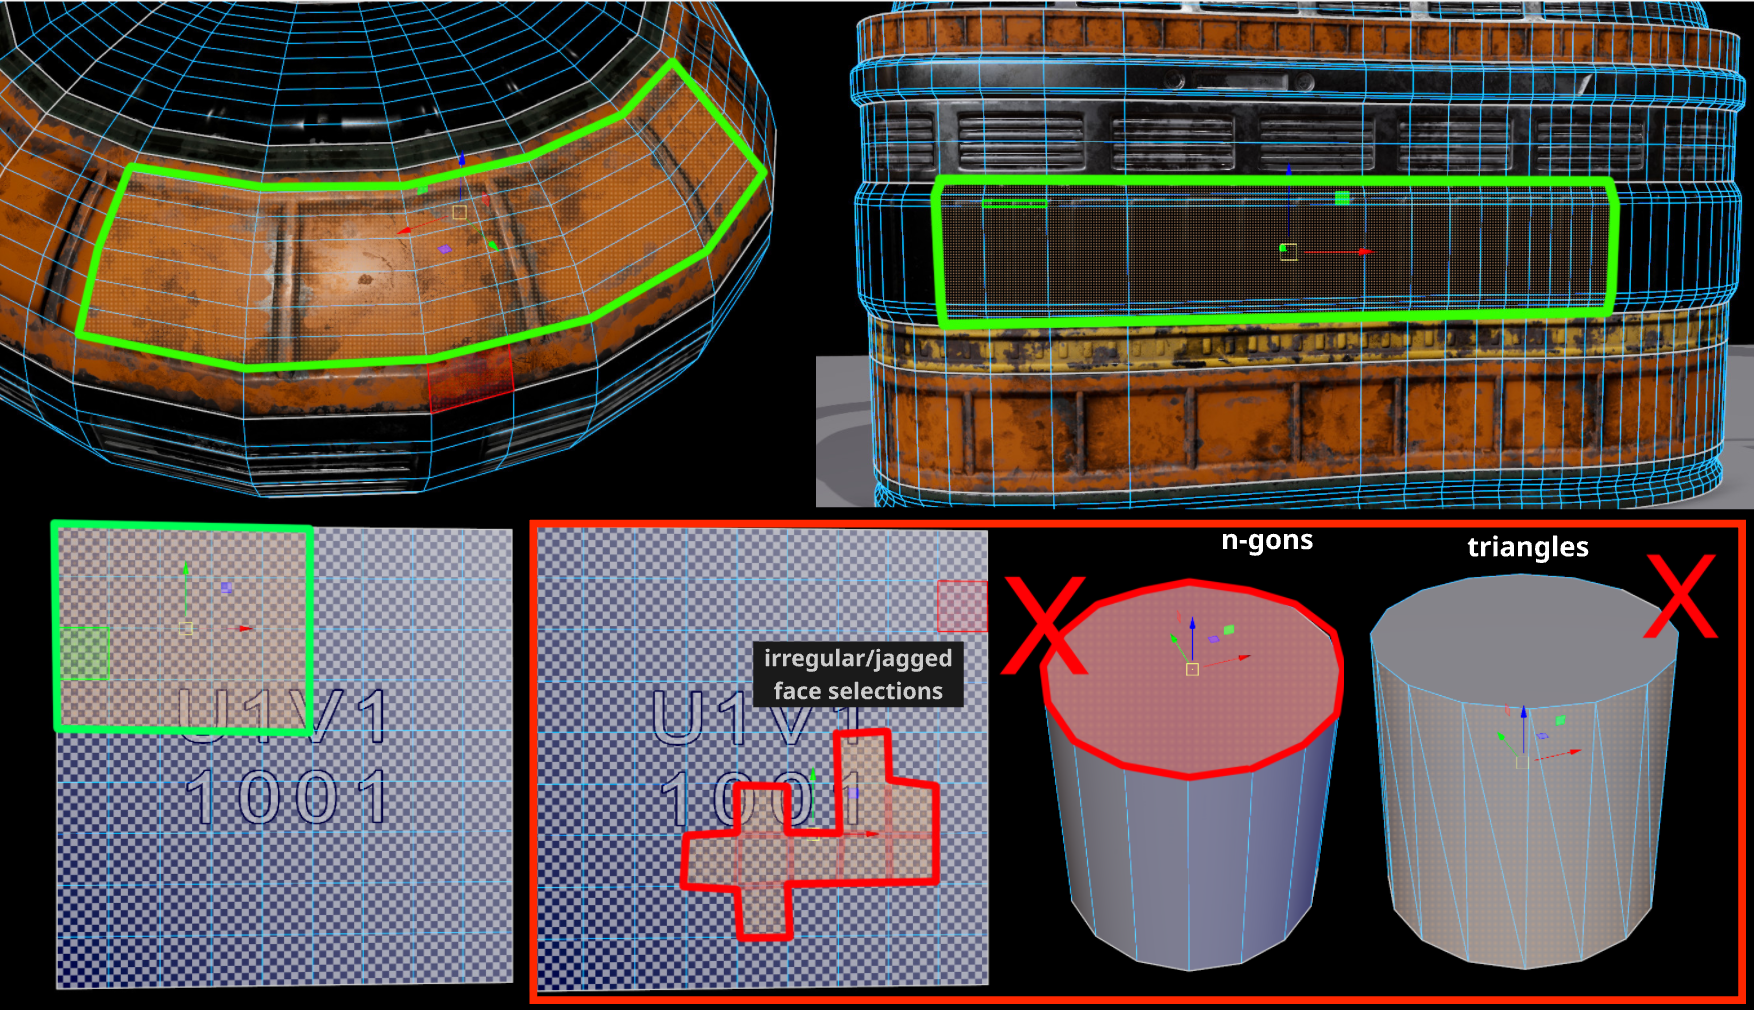
- No n-gons.
-
3. Track Selection Order
-
Order of operations matter for this tool. If you are experiencing issues with aligning UVs check Track Selection Order in your preferences.
- Go to Windows -> Settings/Preferences -> Preferences -> Selection.
- Under modifier you should see the Track Selection Order checkbox.
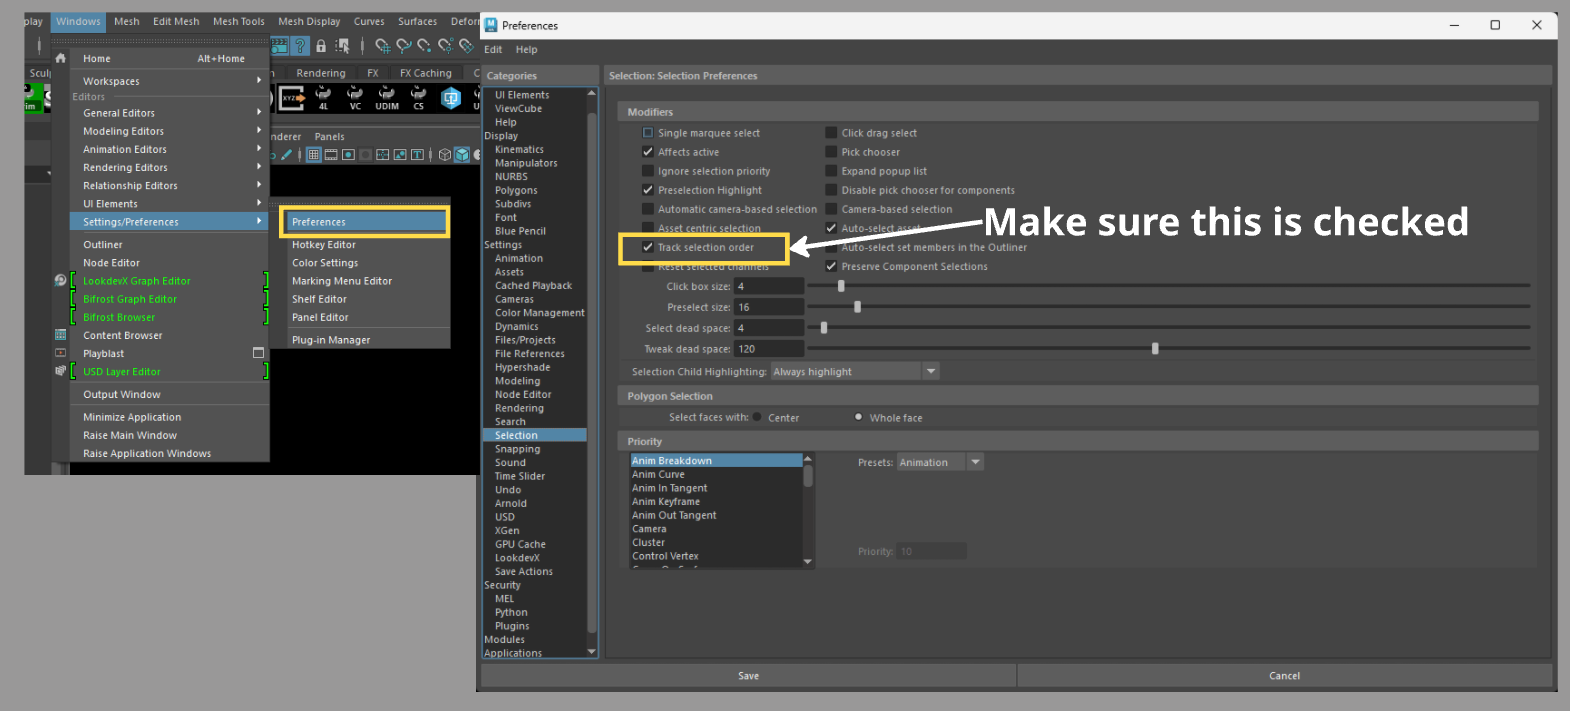
- Go to Windows -> Settings/Preferences -> Preferences -> Selection.
-
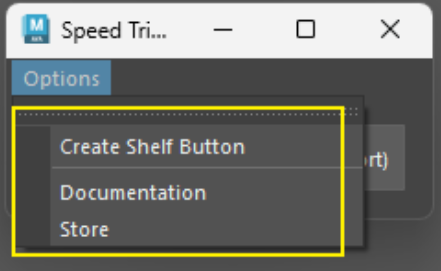
Options Menu
-
Create Shelf Button - Creates a shelf button for this tool directly on your active Maya shelf.
-
Hotkey Setup... - Opens up a window so you can copy the Python code to create hotkeys for Horizonral and Vertical Unfold and Alignment.
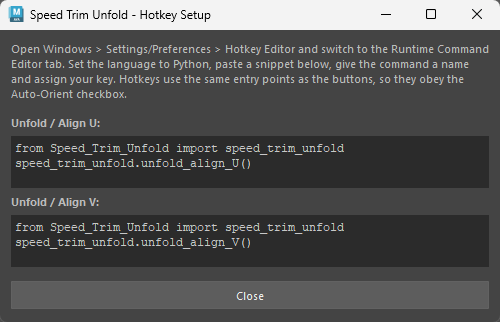
Tip - Hotkey Recommentation
- Since trim sheets are usually long, thin strips of UV shells, it's recommended to use the Unfold/Align U button as a hotkey with the Auto-Orient option always on.
- This ensures your UVs are unfolded horizontally, then oriented and aligned to match whatever the target shell is.
-
Documentation - Opens a link to the documentation.
-
Store - Opens links to ArtStation and Gumroad.